
Imgur API Image Uploader using JavaScript (+ HTML)

Source :- https://compile.blog/imgur-api-image-uploader/

See Example :- https://sh20raj.github.io/Gurimg/

Video Documentation :- https://youtu.be/Gh1ngxdIXAk {% youtube https://youtu.be/Gh1ngxdIXAk %}

Codepen Demo :- https://codepen.io/SH20RAJ/pen/QWqoOrL


Imgur is great for hosting images for free.

There are other platforms like FileStack, Cloudinary, and UploadCare; but among all Imgur is the best for uploading images because it’s free for non-commercial usage.

And, there is a simple way to set up the Imgur API to upload images directly from the local disk.

Here’s how to do it:

Imgur API Image Uploader

Let’s break it into simple baby steps:

Step #1 – Get the Imgur API

First of all, you will have to register your application with the Imgur API. Go to the API page and register an application. It should look like the below screenshot:

Imgur Api

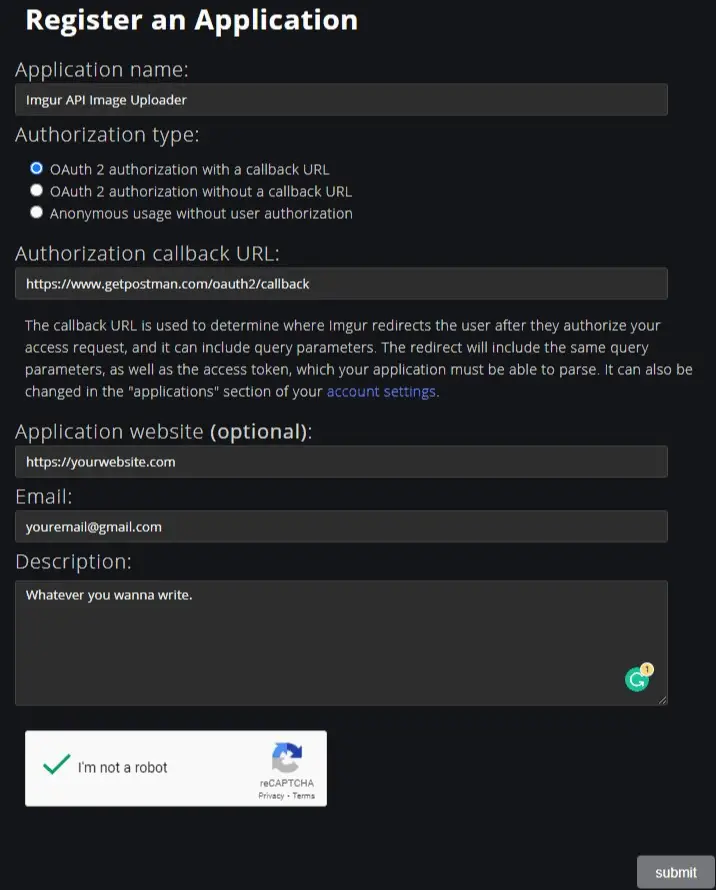
Fill in the following details in the respective fields:

  • Application name: whatever you would like to name it
  • Authorization type: OAuth 2 authorization with a callback URL
  • Authorization callback URL: -https://www.getpostman.com/oauth2/callback
  • Application website: your website address (it’s optional)
  • Email: your email address
  • Description: however you’d like to describe your app

As soon as you submit, you will be presented with the Client ID and Client Secret, save both somewhere.

SS

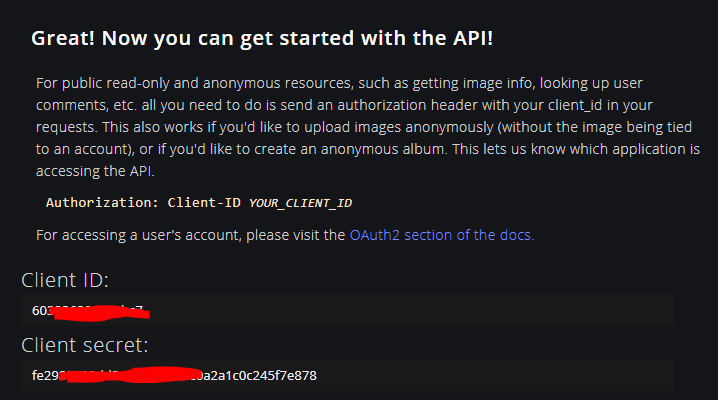
It should look much like the screenshot above.

Step #2 – Create the Uploader

Well, most of the work is done by now.

You just have to create an HTML file, copy the below code and save.

And yes, don’t forget to replace the YOUR_CLIENT_ID with the real Client ID that you saved in the Step #1.

<!DOCTYPE html>
<html lang="en">

<head>
    <meta charset="UTF-8">
    <meta name="viewport" content="width=device-width, initial-scale=1.0">
    <title>Imgur API Image Uploader</title>
</head>

<body>
    <img src="https://i.imgur.com/U7afLiO.png" id="img" height="200px">
    <br />
    <input type="file" id="file">
    <br />
    <strong>
        <p id="url"></p>
    </strong>

    <script>
        const file = document.getElementById("file")
        const img = document.getElementById("img")
        const url = document.getElementById("url")
        file.addEventListener("change", ev => {
            const formdata = new FormData()
            formdata.append("image", ev.target.files[0])
            fetch("https://api.imgur.com/3/image/", {
                method: "post",
                headers: {
                    Authorization: "Client-ID YOUR_CLIENT_ID"
                },
                body: formdata
            }).then(data => data.json()).then(data => {
                img.src = data.data.link
                url.innerText = data.data.link
            })
        })
    </script>

</body>
</html>

Voila! Your Imgur API Image Uploader is ready.

Try opening the HTML file in your browser and test it out by uploading any image, it should return you the URL of the uploaded image.

That’s it.

And yes, either you can run the HTML file in the browser directly from the local disk, or you can upload it on Netlify or Github Pages.

If you’ve got any related query, feel free to let me in the comments.

https://dev.to/sh20raj/imgur-api-image-uploader-using-javascript-html-4b1c

Comments

Popular posts from this blog

How to Add a VS Code Editor to Your Website

How to Add a VS Code Editor to Your Website The Monaco editor by Microsoft provides a code editor component that can be easily integrated into websites. With just a few lines of code, you can add a full-featured editor similar to VS Code in your web app. In this tutorial, we'll see how to do just that. Getting Started To use Monaco, we need to include it in our page. We can get it from a CDN: < script src = "https://cdnjs.cloudflare.com/ajax/libs/monaco-editor/0.23.0/min/vs/loader.min.js" > </ script > This will load the Monaco library asynchronously. Next, we need a <div> in our HTML where we can instantiate the editor: < div id = "editor" ></ div > Now in our JavaScript code, we can initialize Monaco and create the editor: require .config({ paths : { 'vs' : 'https://cdnjs.cloudflare.com/ajax/libs/monaco-editor/0.23.0/min/vs' }}); require ([ "vs/editor/editor.main" ], function ( ) { const ...

10 Free GitHub Copilot Alternatives for VS Code in 2024

10 Free GitHub Copilot Alternatives for VS Code in 2024 As developers, we're always on the lookout for tools that can help us write code more efficiently. GitHub Copilot has been a game-changer in this regard, but its premium pricing may be a deterrent for some. Fortunately, there are several free alternatives available that offer similar functionality. In this article, we'll explore 10 of the best free GitHub Copilot alternatives for Visual Studio Code in 2024. Comparison of Free GitHub Copilot Alternatives Tool Language Support Auto-Completion Code Generation Code Explanation Bito Python, JavaScript, TypeScript, Java, C#, C++, Go, Ruby, PHP, Swift, Kotlin, Rust, Scala ✓ ✓ ✓ Tabnine Python, JavaScript, TypeScript, Java, C#, C++, Go, Ruby, PHP, Swift, Kotlin, Rust, Scala ✓ ✓ ✗ Amazon CodeWhisperer Python, JavaScript, TypeScript, Java, C#, C++, Go, Ruby, PHP ✓ ✓ ✗ Codeium Python, JavaScript, TypeScript, Java, C#, C...

Top React UI Libraries ๐ŸŒŸ

๐ŸŒŸ The Ultimate Roundup of Top React UI Libraries for Your Next Project! ๐Ÿš€๐ŸŽจ Hey there, React wizards! ๐Ÿช„✨ Ready to take your frontend game to the next level? Let's dive into an even broader spectrum of incredible React UI libraries that'll make your interfaces shine like never before! ๐Ÿ’ป๐ŸŒˆ 1. Tremor UI ๐ŸŒŠ ๐ŸŒŸ Tremor UI is a rising star in the React UI galaxy! ✨ It offers a sleek and modern design language, perfect for crafting stylish buttons and more. ๐Ÿ”˜๐ŸŽจ With Tremor, you can effortlessly create eye-catching user interfaces with its intuitive API and customizable components. ๐Ÿช„✨ Key Features : Modern Design Aesthetic Easy Customization Focus on User Experience 2. Radix UI ๐ŸŒฑ ๐ŸŒŸ Radix UI is all about building accessible, powerful components for React. ๐Ÿ› ️๐Ÿ”ฉ From modals to tooltips, Radix UI provides a solid foundation for creating interactive and user-friendly interfaces. ๐ŸŒ๐Ÿงก Dive into Radix ...

Random Posts